ShareThis

8/11/2012 Your PC’s CPU isn’t compatible with Windows 8 – Error Explained


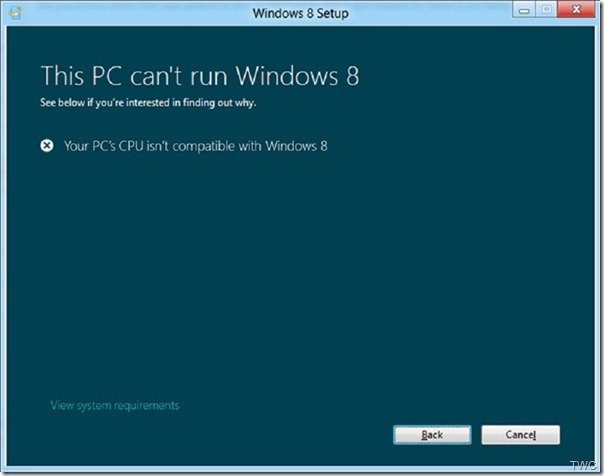
Some people who are trying to install Windows 8 Release Preview are reporting an error. This error has been reported even by those who could run Windows 8 Consumer Preview on the same machine. While installing Windows 8 Release Preview , you may see the following error message:

Your PC’s CPU isn’t compatible with Windows 8


PCNotsupprtWin8z Your PCs CPU isnt compatible with Windows 8   Error Explained

So what has changed since the Consumer Preview? Let us check what this error is and what Microsoft is saying about it.

As we can see, this error is related to CPU requirements for Windows 8 Release Preview. So to install Windows 8 RP, your CPU (processor) must support these features – PAE/NX/SSE2 .
Let us see what these means.

No-eXecute (NX) is a processor feature that allows marking of memory pages as non-executable. The feature allows the CPU to help guard the system from attacks by malicious software. When the NX feature is enabled on a system, it prevents malicious software code from being placed in accessible regions of memory to be executed when control reaches that memory location. Windows 8 requires that systems must have processors that support NX, and NX must be turned on”

“Streaming SIMD Extensions 2 (SSE2) is a previous standard that is supported in Intel and AMD processors. All processors that support NX also support SSE2.”

“To use the NX processor feature, the processor must be running in Physical Address Extension (PAE) mode. PAE is a processor feature that enables x86 processors to access more than 4 GB of physical memory on capable versions of Windows. “

The processor requirement won’t impact customers on modern systems, or on systems that meet logo requirements for Windows 7 because these systems have PAE-capable 32-bit processors that support NX and allow NX to be turned on. Only a small set of customers who have Windows 7 running on very old 32-bit processors without PAE/NX support will be impacted.

Check if your system  Supports NX or SSE2

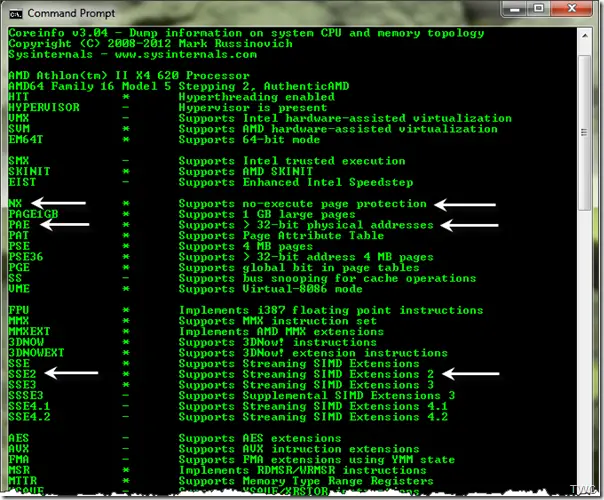
To check this, there’s a Windows Sysinternals tool Coreinfo , a command-line utility. You can get it from here. Running this from the command line, will provide the required info - need to download coreinfo software.

coreinfoCPU Your PCs CPU isnt compatible with Windows 8   Error Explained


A supported processor feature will have the * character displayed next to the feature name, and a - character if not supported.

“If PAE is displayed as not supported in Coreinfo output, your system has a processor that is not PAE-capable, and cannot support NX. If PAE is shown as supported, but NX is displayed as not supported in Coreinfo output:

· Consult the feature set published by the CPU manufacturer to determine if NX is supported by the processor on your system.
· If the processor on your system does have the NX support, then your system may have misconfigured BIOS setting for NX support option.
If NX is supported on your system, can be turned on from BIOS settings if its not turned On.”

So check the BIOS and enable NX (“No eXecute bit”) or the equivalent XD (“eXecute Disabled”) feature in the BIOS settings. Look them in Advanced or Security options in BIOS. They may be referred by various names according to BIOS manf. They can be named No Execute Memory Protect, Execute Disabled Memory Protection, EDB (Execute Disabled Bit) , EVP (Enhanced Virus Protection) or by some oth name. So check for these.
If the BIOS doesnt show any of these option for NX , then check with BIOS manf for any BIOS updates which might have added this. Very old processors may not include this feature.

Error 0×0000260

A related error is also seen in when trying to install Windows 8 in a VM with an error 0×0000260.

“If the Virtual Machine (VM) is hosted on a system that supports NX, you must enable PAE/NX in the virtualization product’s settings or configuration manager when setting up the Windows 8 virtual environment. “

For more detailed info on PAE/NX/SSE2 requirement for Windows 8, Microsoft has published a Whitepaper -  PAE/NX/SSE2 Support Requirement Guide for Windows 8

This document details the processor support for the PAE/NX/SSE2 requirement in Windows 8, error cases and scenarios that customers encounter when machines fail to meet the requirement, and what to do to install Windows 8 on their PCs. The information provided in the document applies to Windows 8 and Windows Server 2012.

Microsoft’s Bill Fill explained in detail about this error in The Answers Forum. He starts with apology for the inconvenience caused by this issue and thanks the users for trying out the Release Preview. Further he says that Microsoft may contact a few of those who reported this issue if further info is needed as it may be a bug and has to be corrected before RTM.

Then he describes what exactly has changed since CP as users who could run the CP on their machine encountered this issue while installing RP on the same machine.

What has changed in Windows 8 RP, since CP

We did make changes in the upgrade detection logic since the CP. The changes revolve around the default installer and how it checks for precise CPU features before continuing. Windows 8 requires the NX capabilities of modern CPUs. This is done for security reasons to ensure that malware defense features work reliably. This is important as we want to ensure that people can feel safe using lots of different software including desktop apps and apps from the Windows Store. This means some very old CPUs will not work with Windows 8. In the CP we did not block the installer for the NX feature. Based on CP telemetry we felt adding the block to setup was warranted to respect people’s time. It is better to get it over with quickly, even if it is disappointing.

We also used the telemetry to get some handle on how many CPUs would fail the NX requirement so we could be sure enforcing NX presence was responsible in the ecosystem. We learned that less than 1% of CPUs did not have NX capability available and configured correctly and out of those 0.1% did not have the NX capability at all. Based on this we feel that enforcing NX presence is a good thing to do since it results in better malware defenses. Thus we now enforce NX presence in the kernel boot sequence.
We didn’t make any change related to PAE detection, but it is good to note that PAE is a pre-requisite for NX on 32 bit processors due to how NX is implemented in memory manager page tables.

We did change SSE2 instruction set detection based on telemetry from the CP and Windows 7.
The result for users at large is their PC is more reliable. We do not check for SSE2 in the kernel boot sequence,;however, if your CPU has NX it also almost certainly has SSE2.

Workaround

Before trying this workaround, please check & configure NX in BIOS. The the workaround uses the ISO to install.

“Download the ISO and burn it to a DVD or create a bootable USB flash drive. Boot from the media that you created. If your CPU does not support NX you will see a code 5D bluescreen before setup starts. This is rare, but if it happens we won’t be able to help you run Windows 8.
This workaround may succeed because Windows contains two installers: the end user installer (setup.exe at the root of the Windows DVD) and the commercial installer (setup.exe found in the \sources directory of the Windows DVD). The commercial installer runs when the PC is booted from DVD/USB media and does not perform the NX/SSE2 checks and attempts to enable NX/SSE2 on supported systems.”

This issue has been explained in detail by Microsoft. If someone getting this error, he or she can refer this and try the workaround.

Digg it StumbleUpon del.icio.us

8/09/2012 How to Install Windows 8 RTM on Your Computer


Windows 8 has been finalized and it is made available gradually through different channels. For those who are new to Windows 8 and would like a detailed step by step tutorial on how to install it on their computers and devices, we have created this guide. We will cover the following: how to burn your Windows 8 image to a disc or create a bootable USB drive, how to install Windows 8 and how to go through the initial configuration screens.
UPDATE: The article includes instructions relevant for the final version of Windows 8 (build 9200).

What to Expect from Windows 8

If you are not familiar with the novelties introduced by the new release of Windows 8, first check out video which summarizes some of the most obvious changes.

Installation Prerequisites

First, you need to download the final version from Microsoft or purchase it through one of the official channels available.
If you want to burn the .iso image on a disc, check our tutorial: The Complete Guide to Burning Disk Images (ISO & IMG) In Windows 7. Also, if you want to create a bootable memory stick with the Windows 8 setup on it, don’t hesitate to read this tutorial: How to Make a Bootable USB Drive to Windows, Linux or MS DOS.
If you want to run Windows 8 in a virtual machine, the only free software with which you can use is VirtualBox. When starting the Create New Virtual Machine wizard, select Windows 8 as the operating system and Virtual Box will adjust its settings so that everything runs smoothly.

Windows 8 Setup

If you still have issues, check this guide on what settings must be turned on: You need to have hardware virtualization enabled if you want to run Windows 8 in Virtual Box.
In order to install Windows 8, you need to have a valid product key, appropriate for the specific version you are installing. You also need a Microsoft account. If you don’t know much about it and how it helps you to have one, check this article: Simple Questions: What is a Windows Live ID or a Microsoft account?.

The Windows 8 Installation Procedure

First, you need to boot your computer using your Windows 8 installation disc. If you are using a virtual machine, boot from the .iso installation image.
Windows 8 takes a while to load the setup files, during which you will see mostly a black screen, similar to the one below.

Windows 8 Setup

Once the necessary files are copied, the setup starts by asking what language, time, currency and keyboard input settings you want to use. Make the selections you prefer and click Next.

Windows 8 Setup

Click the Install now button to start the installation.

Windows 8 Setup

You are asked to enter the product key required to activate your Windows 8 installation. Type the product key you purchased and click Next. If you have purchased a retail version of Windows 8, the product key will be found in the packaging of the installation discs. The same product key will be later on required to activate Windows 8, after the installation is done.

Windows 8 Setup

You are asked to read the license agreement. Check the "I accept the license terms" box and click Next.

Windows 8 Setup

You are asked to choose between making an upgrade or a custom installation. Choose "Custom: Install Windows only (advanced)".

Windows 8 Setup

Now you are asked to select where you want to install Windows 8. Select the partition you desire and click Next. If you are installing Windows 8 in a virtual machine, or on a new computer you need to first create the partition. Therefore click on Drive Options.

Windows 8 Setup

Then, create the partition using the New button.

Windows 8 Setup

Specify the size of the partition and click Apply.
NOTE: Windows 8 has approximately 10GB of space without any special extras installed. If you want to install other applications, you should make a larger partition for it. My recommendation is to go for a minimum of at least 20 - 25 GB.

Windows 8 Setup

You are asked to confirm if you are OK with Windows 8 creating an additional partition for its system files, that will be used for boot and recovery. Click OK.

Windows 8 Setup

Make sure the correct partition is selected and click Next.
NOTE: At this step you can also format the partition where Windows 8 is going to be installed, prior to pressing Next.

Windows 8 Setup

The installation finally starts. The setup will take a few minutes to copy all the required files and install the operating system.

Windows 8 Setup

Once the installation is done, the Windows 8 setup will automatically reboot your system. Then, you will see the progress of the preparations made for your first login. In order for this process to finish, you might need to go through another reboot, depending on your computer’s hardware configuration.

Personalizing the Windows 8 Installation

After the reboots are done, Windows 8 will require some time to get things ready.

Windows 8 Setup

Then, you are asked to personalize your Windows 8 installation. Start by giving a name for your computer. If you type some "unauthorized" characters like $, %, &, you will be notified appropriately. Also, choose the background color you prefer. Once done, click Next.

Windows 8 Setup

If you are installing Windows 8 on a laptop or device with a wireless network card, you are asked to select the wireless network to connect to and type the appropriate password for connecting to it. On a computer or device connected via cable to the network, you won’t go through this step.
Next, you need to choose if you want to use the Express settings Windows 8 comes bundled with, or you want to customize your installation. Let’s get our hands dirty and see what happens if you click Customize.

Windows 8 Setup

First, you are asked if you want to turn on file sharing or not. Select the option you prefer.

Windows 8 Setup

Then, you are asked about the default behavior of Windows Update and that of security features like the SmartScren Filter. Change the things you are interested in and click Next.

Windows 8 Setup

Next, you are asked if you want to send different types of information to Microsoft. Set things according to your preference and click Next.

Windows 8 Setup

Then, you are asked about troubleshooting options and what you want to turn on. Also, you can set if apps can use your name and account picture and if they are allowed to access your location. Set things as you wish and click Next.

Windows 8 Setup

Finally, you get to the "Sign in to your PC" screen. To experience Windows 8 to its fullest, it is best to use your Microsoft account (also known as Windows Live ID to sign in. Type your Microsoft account and click Next.

Windows 8 Setup

NOTE: If you would rather not sign in using a Microsoft account, click on "Sign in without a Microsoft account" link at the bottom of the window and follow the instructions shown by the setup wizard.
Then, you are asked to enter your Microsoft account password. Type it and click Next.

Windows 8 Setup

Then, you can provide an alternate e-mail and phone number to recover your account password, in case you forget it or it is changed by unwanted guests. Provide the requested details and click Next.


Windows 8 Setup

Windows 8 takes a while to prepare your computer and all the settings.

Windows 8 Setup

While the preparations are made, you are shown a brief tutorial about how to access the new charms bar - one of the most important changes in Windows 8. I recommend that you pay attention to the instructions being shown at this stage.

Windows 8 Setup

Once the tutorial ends, you are shown further information about the progress of the Windows 8 customisation via a few colored screens and messages.

Windows 8 Setup

Once everything is done, you are shown the Windows 8 Start screen.

Windows 8 Setup

If you press Win+D or click on the Desktop tile, you can view also the classic desktop.

Windows 8 Setup

Welcome to your first Windows 8 experience!

Conclusion

As you can see from this article, the Windows 8 installation starts in a very similar way to that of Windows 7. However, the closer you get to your first login, things change dramatically and the new user interface takes the stage. To learn more about Windows 8 don’t hesitate to read the articles we published in our Windows 8 section.

@ Atulplayer
Digg it StumbleUpon del.icio.us
Related Posts Plugin for WordPress, Blogger...

Recent Posts


Popular Posts

Facebook Comment

Trade traffic with me using 2leep.com system